• Skip to main content
  • Skip to primary sidebar
Listen to the Latest Podcast EpisodeAnd We’re Back! Introducing: Diabetes Digital
Food Heaven Made Easy

Food Heaven Made Easy

Black Registered Dietitian Nutritionists | Intuitive Eating Dietitians

  • About
  • Press
    • Diabetes Digital
    • Start Here
    • Podcast
      • Hookup Codes
    • Work With Us
    • Resources
      • Recipes
      • Blog
      • Cookbook
      • Books We Love
    Looking for nutrition counseling with expert registered dietitians?
    Get Started

    Wendy

    Ultimate Summer Salad in a Jar

    July 26, 2017 by Wendy 4 Comments

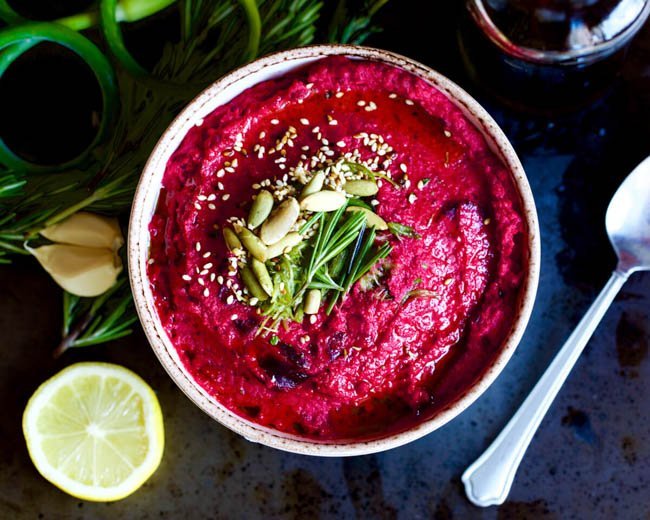
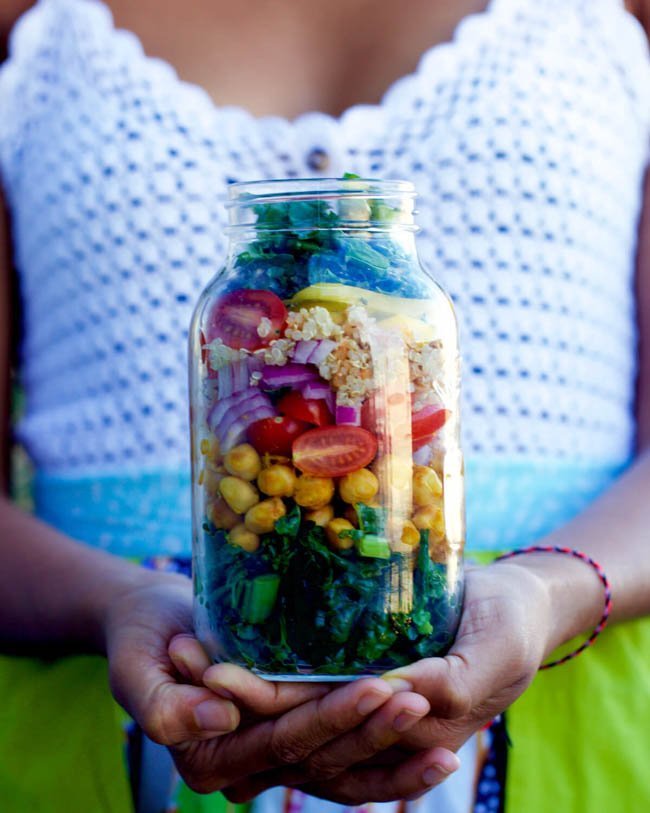
    Salads in a jar are one of our favorite ways to pack a meal on the go. We love them for so, so many reasons. Not only are they convenient and simple, but there’s so many ways to make them healthy and delicious. They’re a great tool when balancing a hectic work life.

    Wash, prep, and assemble your salads for the week, pop the lid on, and save for grabbing quickly in the mornings. When ready to eat, add onto a plate and enjoy with your favorite dressing!  

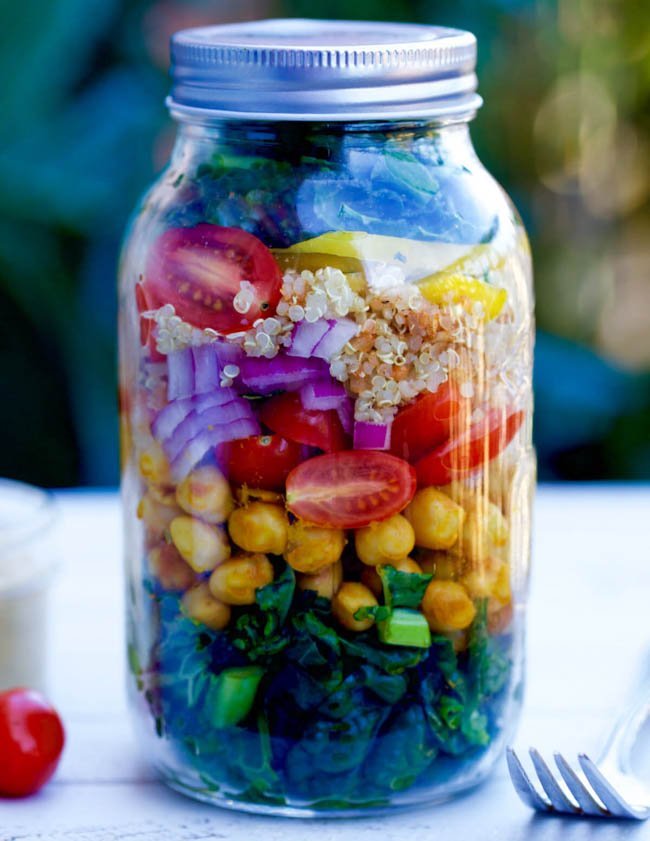
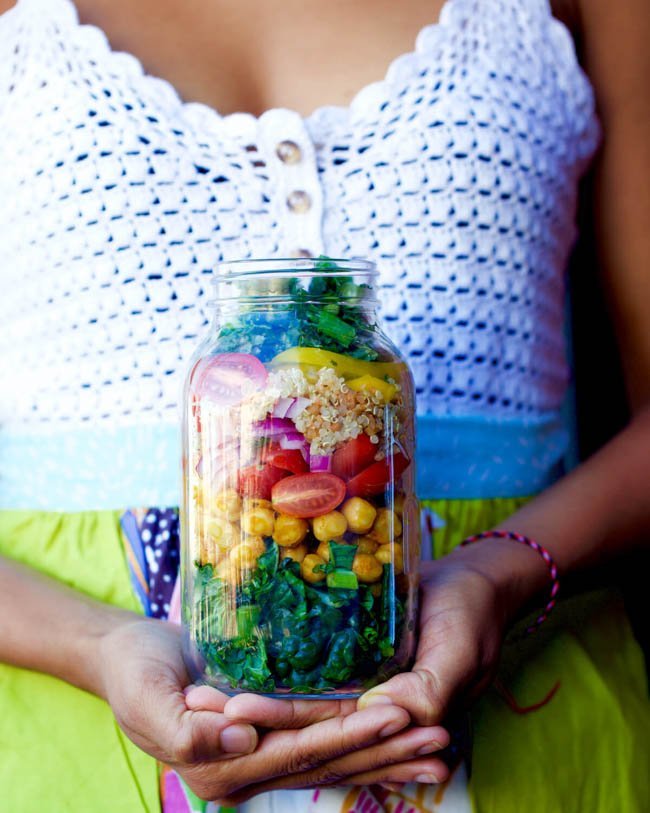
    The true key to mastering salads in a jar is proper layering. When layering, there is method to the madness. Start with your salad dressing. You’ll want this at the bottom of the jar or in a separate container, which is what we did. It’s all a matter of preference. If you have greens that wilt easily (think: baby spinach, lettuce), you want to keep those at the top, away from moist ingredients like dressings, tomatoes, and cooked grains. If you have hardier greens (ie kale, collards), we prefer having those closer to those wet ingredients, so they can soften up and become easier to chow down. Also aim for a balance of carbs (quinoa), protein (chickpeas), vegetables (kale, tomatoes, onions, peppers) and fat (our tahini dressing).

    I went to the farmers market last week, and picked up tons of colorful summer produce, which is what inspired this recipe. There’s so much variety in produce during summers in New York, so I took that as an opportunity to throw a bunch of beautiful colors into the jar. I prepared it the night before, and had a huge salad waiting for me in the morning.

    Let’s get started on how you’ll be preparing this ultimate summer salad. In a bowl, combine the chickpeas with the turmeric and a pinch of salt. Set aside. Grab your jar, and let’s start layering. You can add your dressing to the bottom of the jar OR have it on the side, like we did. Start with 1/2 of the kale and add it to the bottom of your jar. Then add the seasoned chickpeas. Next add the tomatoes and onions. Then the cooked quinoa (you can salt this, to taste, as well). Top with the yellow bell peppers, and the remainder of the kale. That’s it!

    Make sure to tightly seal it and enjoy for the week! What are your favorite salad in a jar renditions? Let us know in the comments below! xo

    Print
    The Ultimate Summer Salad in a Jar
    Servings: 1
    Ingredients
    • 1 cup cooked chickpeas
    • 1/2 teaspoon turmeric
    • 1 1/2 cups kale, finely chopped
    • 1/2 cup cherry tomatoes, halved
    • 2 tablespoons red onion, chopped
    • 1/2 cup cooked quinoa
    • 1/2 yellow bell pepper, sliced
    • Salt, to taste
    Instructions
    1. In a bowl, combine the chickpeas with the turmeric and a pinch of salt. Set aside
    2. Grab your jar, and let's start layering
    3. You can add your dressing to the bottom of the jar OR have it on the side, like we did (see the post for dressing ideas)
    4. Start with 1/2 of the kale and add it to the bottom of your jar
    5. Then add the seasoned chickpeas
    6. Next add the tomatoes and onions
    7. Then the cooked quinoa (you can salt this, to taste, as well)
    8. Top with the yellow bell peppers, and the remainder of the kale
    9. That's it! Enjoy by pouring onto a plate or bowl and top with your favorite dressing.

    Filed Under: Main Courses

    Herbed Salt 3 Ways

    July 21, 2017 by Wendy Leave a Comment

    Today we bring you these insanely adorable and tasty herbed salt! They’re so easy to prepare, and help to add flavor to your dishes. I’ll be the first to admit that I have a weakness for salt. I enjoy my dishes well-seasoned and thought, why not incorporate these herbs and spices into a salt mix?

    That way I get the best of both worlds. The results are a Spicy Turmeric Salt, Garlicky Sage Salt, and Peppery Rosemary Salt. Yes, they’re as good as they sound. I’ve seen spiced salt mixes at the store, but they’re usually loaded with additives, anti-caking agents, and other random ingredients. 

    Many cultures that include a variety of herbs and spices in their diets have seen powerful health benefits. Turmeric is a staple in South Asian dishes for centuries. It has been shown to reduce inflammation in a number of chronic disease and may aid in digestive disorders. It’s commonly used for teas, tonics, skin creams, and more. Similarly, herbs like rosemary, parsley, and sage, all provide a wide range of medicinal properties.

    To get started with our recipe for these herbed salts, you’ll want to leave your fresh herbs out in the sun for one day, so they can dry out. These would be the sage, parsley, and rosemary. If you don’t have access to direct sunlight somewhere outside, you can place the herbs by a window that does get direct sunlight. Alternatively, you can skip this step by using dried herbs from the market. 

    Next, add the ingredients for the particular salt blend you’re making into a completely dry blender. Blend until everything is mixed well together, and you have uniform consistency and color. Store your salt in a small glass container, and use it in your favorite dishes! These also make for the cutest gifts! 

    Have you made herbed salts before? Let us know your favorite blends in the comments below! If you try these, make sure you tag us in your pics, and let us know how they came out for you. xoxo

    Print
    Herbed Salt, 3 Ways
    Ingredients
    Spicy Turmeric Salt
    • 1/4 cup ground turmeric
    • 1/4 cup ground smoked paprika
    • 1/2 tablespoon ground cayenne pepper
    • 2 tablespoons sea salt
    Garlicky Sage Salt
    • 1/4 cup dried sage leaves
    • 1/4 cup dried parsley leaves
    • 1 tablespoon garlic powder
    • 2 tablespoons sea salt
    Peppery Rosemary Salt
    • 1/2 cup rosemary leaves
    • 1 tablespoon ground black pepper
    • 1/4 cup sea salt
    Instructions
    1. If using fresh herbs (sage, parsley, rosemary), leave them out in the sun for one day so the herbs can dry out.
    2. You can also put them by a window that gets direct sunlight.
    3. If using dried herbs, skip this step entirely and proceed to add the ingredients for the particular salt blend you're making into a completely dry blender.
    4. Blend until everything is mixed well together, and you have uniform consistency and color
    5. Store your salt in a small glass container, and use it in your favorite dishes!

    Filed Under: Spreads, Condiments, Sauces

    What Exactly Is Plant-Based? w/ Sharon Palmer

    July 17, 2017 by Wendy Leave a Comment

    Hey everyone, on today’s episode we’ll be talking all about plant-based living- what that means, why it’s important, and practical ways to get more plant foods in your life. This episode is sponsored by the US Highbush Blueberry Council, which Jess and I are both spokespeople for. In case you missed it on the socials, this year we launched a video recipe series with them that features fun and delicious ways to incorporate blueberries!


    And to make things even sweeter, this month is actually National Blueberry Month, so at the end of the episode, we’ll highlight 3 ways to incorporate blueberries into your life. For today’s episode, we’re chatting with Sharon Palmer, award-winning dietitian & author. She’s an expert on all things plant-based, so she’s the perfect guest for today’s episode. 

    In this episode, we discuss:

    1. What plant-based eating actually means
    2. Common misconceptions about plant-based eating
    3. Common reasons people fall of the wagon when trying to eat more plant-based, and how to avoid those pitfalls 
    4. Practical things people can do at home to live more plant-based and boost our health status
    5. Tips that work to get children eating more plant-based foods, and more! 

    [line]

    And now for 3 of our favorite ways to incorporate blueberries into recipes:

    1. Smoothies: This is probably our all time favorite way to use blueberries. Super basic (we know), but there’s nothing more delicious than blending frozen blueberries with our favorite fruits & vegetables, especially during those hot summer months. My go-to smoothie consists of frozen blueberries, almond milk, banana, spinach, and flaxseed. 
    2. Blueberry Jam: If you’re into using jellies and jams as spreads, this this one is for you. By simply blending fresh blueberries with chia seeds and a touch of maple syrup, you have a delicious jam that’s ready to be enjoyed on top of toast or as part of a PB&J.
    3. Blueberry Oats: For all you oatmeal lovers, there’s nothing better than throwing in a serving of blueberries into your morning oats. It’s a great way to add a punch of fiber and vitamin C to your day.

    Shout out to the US Highbush Blueberry Council for sponsoring this episode, and a big thank you to Sharon for being our guest. We’ll catch you next time! 

    Filed Under: Podcast

    Roasted Garlic Beet Hummus w/ Garlic Scapes

    July 5, 2017 by Wendy 6 Comments

    Who’s ready for this creamy Roasted Garlic Beet Hummus w/ Garlic Scapes?! We whipped this up at home and it was gone by the end of the day. Adding beets to hummus is a fantastic way to boost the nutritional profile of this already yummy spread.

    Beets are a root vegetable rich in folate, which helps to keep us energized throughout the day. They contain betalains, which are a phytochemical with antioxidant properties. Antioxidants have the potential to reduce your risk for certain cancers and other chronic diseases. Pro tip: Did you know that the greens on the beets are edible? Beet greens are a great source of magnesium, which keeps your brain and muscles functioning properly. Save those greens to add into other recipes or quickly sauté with some onions and olive oil. Beets grow well all over the country and they are in season in early summer and fall.

    Now moving on to garlic scapes…any fans? Garlic scapes are long, skinny bulbs that grow out of the garlic head. They have a mild, garlicky taste that pairs beautifully with sautés, sauces, and spreads. I got these beauties at the farmers market, and was thinking long and hard about ways I could incorporate them into recipes. Well, I decided to whip up them up as a topping for our Roasted Garlic Beet Hummus. They’re not super common at the markets, so if you can’t get your hands on them, just proceed with the recipe with the other toppings. 

    Now, let’s get into this recipe. Start by preheating the oven to 400F. Chop about 1/4″ from the top of the garlic head, exposing the cloves. Add this to a sheet of aluminum paper + the beets, and drizzle 2 teaspoons of olive oil over both. Cover with the aluminum and bake for 25-30 minutes, or until the garlic and beets are tender. Allow to cool, remove the garlic cloves from their skins, and add them to a food processor, with the beets, the rest of the olive oil, chickpeas, tahini, and lemon juice.

    Pulse until completely smooth. Set aside, and let’s sauté our garlic scapes. Heat sesame seed oil, and sauté the scapes for 4-5 minutes, until golden. Serve the hummus in a bowl, and top with the scapes, sesame seeds, your favorite herbs (we used rosemary) and salt, to taste. Enjoy with vegetables, toast, crackers, or with salads!

    Drop a comment below to let us know how you liked this Roasted Garlic Beet Hummus w/ Garlic Scapes!

    Print
    Roasted Garlic Beet Hummus w/ Garlic Scapes
    Servings: 4
    Ingredients
    • 1 medium beet, peeled & chopped
    • 1 head of garlic
    • 2 teaspoons + 2 tablespoons olive oil
    • 1 cup cooked chickpeas
    • 2 tablespoons tahini
    • Juice of 1/2 lemon
    For the toppings
    • 1 teaspoon sesame seed oil
    • 2 garlic scapes, finely chopped
    • Pumpkin seeds
    • Fresh herbs, finely chopped
    • Salt to taste
    Instructions
    1. Preheat the oven at 400F. Chop about 1/4" from the top of the garlic head, exposing the cloves
    2. Add the garlic head to a sheet of aluminum paper + the beets, and drizzle 2 teaspoons of olive oil over both
    3. Cover with the aluminum and bake for 25-30 minutes, or until the garlic and beets are tender
    4. Allow to cool, remove the garlic cloves from their skins, and add them to a food processor, with the beets, the rest of the olive oil, chickpeas, tahini, and lemon juice
    5. Pulse until completely smooth
    6. Set aside, and let's sauté our garlic scapes
    7. Heat sesame seed oil, and sauté the scapes for 4-5 minutes, until golden
    8. Serve the hummus in a bowl, and top with the scapes, sesame seeds, your favorite herbs (we used rosemary) and salt, to taste

    9. Enjoy with vegetables, toast, crackers, or with salads!

    Filed Under: Spreads, Condiments, Sauces

    Vegan Cashew Sour Cream

    June 29, 2017 by Wendy 6 Comments

    We’re bringing you a homemade Vegan Cashew Sour Cream to top these Loaded Vegan Summer Nachos with. You can also add this on to your taco Tuesday, or use it as a healthy dip for your veggies! You don’t need to be a vegan to enjoy this recipe. It is super nutritious while still providing that creamy touch.

    Cashews are super tasty and highly nutritious. They contain potassium, magnesium, and iron to keep you feeling your best. Iron carries oxygen throughout our body to all of our cells, muscles, and even our brain. Getting enough iron in your diet can help stave off that feeling of fatigue to keep you energized all day long. This recipe is a great way to get more plant-based foods into your  meals. By replacing the sour cream with this cashew-based version, you’ll be getting loads of heart-healthy fats into your meals.

    Let’s get started on our recipe! Once the cashews are soaked after about 2-3 hours, drain the water, and blend them with fresh water, apple cider vinegar, and lime juice. Add some salt, to taste, and place in the fridge, in an airtight container, for a few hours so it can firm up a bit. Enjoy with nachos, baked potatoes, vegetables, and more!

    Super simple, right? Interested in giving this a shot? Let us know how it comes out in the comments below!

    Print
    Vegan Cashew Sour Cream
    Ingredients
    • 1 cup cashews, soaked in water for 2-3 hours
    • 1/2 cup water
    • 2 tablespoons apple cider vinegar
    • Juice of 1 lime
    • Salt, to taste
    Instructions
    1. One the cashews are soaked, drain the water, and blend them with fresh water, apple cider, and lime juice.
    2. Add salt, to taste, and place in the fridge, in an airtight container, for a few hours so it can firm up a bit
    3. Enjoy with nachos, baked potatoes, vegetables, and more!
    Recipe Notes

    1 serving=2 tablespoons

    Filed Under: Spreads, Condiments, Sauces

    Happy 6 Year Anni + Lessons Learned

    June 28, 2017 by Wendy Leave a Comment

    This month’s episode is a special one. Why? Well, today marks our 6 year Food Heaven Anniversary!! We can’t believe it’s already been 6 years! Aside from our anniversary, this month is also extra special since Jess and I are June babies, and actually have our birthdays 1 day apart (June 29th & 30th!)

    It’s pretty surreal that 6 years have passed since we started Food Heaven, and so we thought it would be great to have this month’s episode be about lessons learned since starting our brand. We’ll be sharing the ups and downs we’ve experienced, and how all this stuff has been helpful in our growth and development.

    Tune in to listen to the 6 lessons we’ve learned since starting our business and if you enjoy this episode, rate us on  iTunes and stitcher– it helps more people find us. And we would love it if you sent your questions over to us so we can record them into a mini-episode. Simply go to our podcast tab, and record at the top of the page. You can also ****************@***il.com“>email us your recording. Thanks for tuning in! Catch you next time! 

    Filed Under: Podcast

    • « Go to Previous Page
    • Page 1
    • Interim pages omitted …
    • Page 73
    • Page 74
    • Page 75
    • Page 76
    • Page 77
    • Interim pages omitted …
    • Page 96
    • Go to Next Page »

    Primary Sidebar

    Search

    Let’s Connect

    Meet Wendy & Jess

    Registered Dietitians & BFF's. We're probably busy eating right now.

    Subscribe to our Podcast

    food heaven podcast

    Podcast Hookup Codes

    food heaven podcast hookup codes

    Meet Wendy & Jess

    Registered Dietitians & BFF's. We're probably busy eating right now.

    • Diabetes Digital
    • Our Story
    • Recipes
    • Resources
    • Articles
    • Contact
    • Policies
    © Food Heaven Made Easy
    In order to provide you with the best service, our website uses cookies. By continuing to browse the site you are agreeing to our Privacy Policy I consent
    Privacy Policy

    Privacy Overview

    This website uses cookies to improve your experience while you navigate through the website. Out of these cookies, the cookies that are categorized as necessary are stored on your browser as they are essential for the working of basic functionalities of the website. We also use third-party cookies that help us analyze and understand how you use this website. These cookies will be stored in your browser only with your consent. You also have the option to opt-out of these cookies. But opting out of some of these cookies may have an effect on your browsing experience.
    Necessary
    Always Enabled
    Necessary cookies are absolutely essential for the website to function properly. This category only includes cookies that ensures basic functionalities and security features of the website. These cookies do not store any personal information.
    Non-necessary
    Any cookies that may not be particularly necessary for the website to function and is used specifically to collect user personal data via analytics, ads, other embedded contents are termed as non-necessary cookies. It is mandatory to procure user consent prior to running these cookies on your website.
    SAVE & ACCEPT