• Skip to main content
  • Skip to primary sidebar
Listen to the Latest Podcast EpisodeAnd We’re Back! Introducing: Diabetes Digital
Food Heaven Made Easy

Food Heaven Made Easy

Black Registered Dietitian Nutritionists | Intuitive Eating Dietitians

  • About
  • Press
    • Diabetes Digital
    • Start Here
    • Podcast
      • Hookup Codes
    • Work With Us
    • Resources
      • Recipes
      • Blog
      • Cookbook
      • Books We Love
    Looking for nutrition counseling with expert registered dietitians?
    Get Started

    Wendy

    Lentil Rice

    May 19, 2016 by Wendy 15 Comments

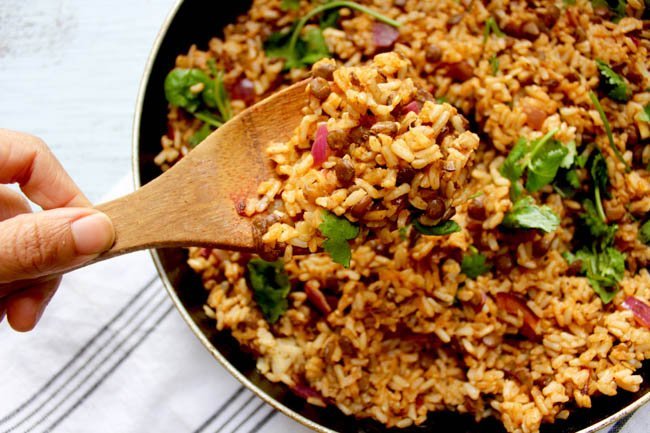
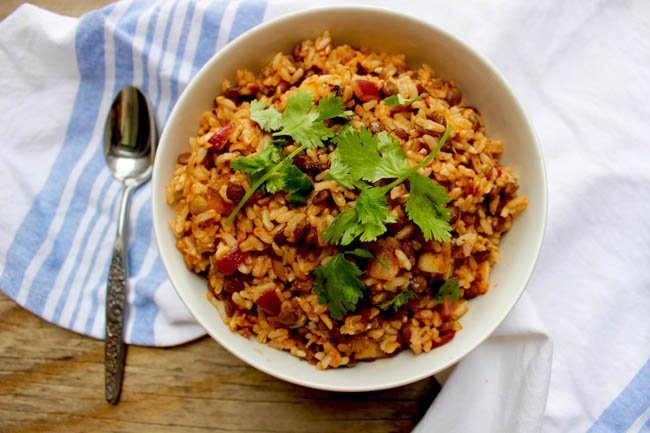
    2016 is The International Year of Pulses, and this week we’re celebrating with this savory coconut lentil rice. For those of you who aren’t sure what pulses are, we’ve got you covered! Pulses are a family of legumes that includes lentils, beans, dry peas and chickpeas. They are a rich source of plant-based proteins and amino acids for people around the world, and can be incorporated into meals in so many fun and creative ways. Along with protein, pulses are rich in fiber, vitamins and minerals like folate, iron, and potassium. Just one cup of cooked pulses gives you over half of the fiber you need for an entire day! They are rich in soluble and insoluble fiber, both of which offer endless health benefits ranging from weight management to improved digestion.

    The pulse featured in this recipe is lentils. Lentils are an excellent source of protein, iron, folate, and potassium. This powerful pulse is rich in fiber and complex carbohydrates, and low in fat and calories. Lentils are so flexible in the kitchen, and can be incorporated in a myriad of ways. 

    Pulses are easily accessible to communities in different parts of the world because of their affordability. They are also amazing for our environment- pulses use a fraction of the water other protein sources use! They enrich our soil, which results in crops with improved nutrient profiles.

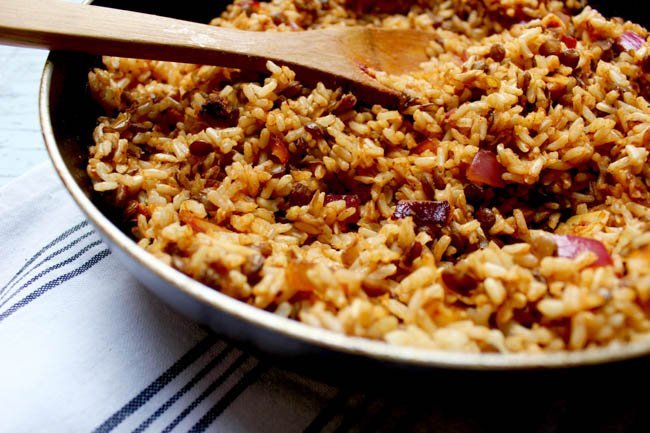
    So now that we all know how amazing lentils and other pulses are, let’s get to this recipe! It’s incredibly easy and straight forward. First you’ll cook your lentils and brown rice separately, until tender. Everyone has their own tricks for cooking brown rice- I usually boil under low-medium heat for 30-40 minutes with the right water ratio (see below) and that works perfectly every time. If you have another way, make sure to go for it! After the lentils and rice are cooked, you’ll sauté them in coconut oil, tomato paste, onions, and garlic. Throw some fresh cilantro in there, and you’re all set!

    Make sure to let us know in the comments below how this recipe turned out for you! Are you a pulse fan? Let us know in the comments below what your favorite pulses are. 

    Print
    Lentil Rice
    Total Time
    45 mins
     
    Servings: 4
    Ingredients
    • 2 ½ cups water
    • 1/2 teaspoon salt
    • 1 cup uncooked brown rice
    • ¼ cup lentils
    • 1 tablespoon tomato paste
    • 1 teaspoon coconut oil
    • ½ onion, chopped
    • 3 garlic cloves, sliced
    • Salt and cayenne pepper, to taste
    • ½ cup fresh cilantro leaves
    Instructions
    1. In a pot, bring the 2 ½ cups of water and salt to a boil

    2. Add the uncooked brown rice and cook over low-medium heat for 35 minutes, with the lid on. Cook with the lid off for the last 5 minutes, or until all the water has evaporated and the rice is tender

    3. While that’s happening, cook ¼ cup of lentils in another pot filled with water for 35 minutes as well or until the lentils are tender. Drain and set aside.

    4. Once the rice and lentils are cooked, heat your coconut oil and tomato paste on a pan. Add the chopped onions, and sliced garlic cloves and sauté together for 2 minutes

    5. Then add the cooked rice and lentils, and using a large spoon, mix all the ingredients well together

    6. Cook on low heat for 3-4 minutes

    7. Remove from the stove, and season with salt and cayenne pepper to taste

    8. Throw in the fresh cilantro, and mix in well with the rice

    This post was created in collaboration with USAPulses & PulseCanada

    Filed Under: Main Courses

    Butternut Squash Arugula Pita Pizza

    May 11, 2016 by Wendy 1 Comment

    Butternut squash arugula pita pizza? Pretty much everything you’ll need for dinner this week. This recipe is great for those days when you get home exhausted, and just want to throw something in the oven. It’s also great for those nights you get in late, and want to keep things simple and lite. Aside from being delicious, butternut squash is a nutrition powerhouse! It is jam packed with vitamins A and C. Butternut squash is also a good source of potassium. So how do you incorporate more into your meals? Personally, I love to throw butternut squash into soups and stews. It’s also a great addition to smoothies, and you can also mash it up and enjoy like mashed potatoes. Now, let’s move on to how you’ll be preparing this recipe.

    First, we’ll start off by handling the butternut squash, which if you’ve done before, you know can be quite the manual work. When I’m pressed for time, I purchase the squash peeled and sliced (what I did for this recipe) but you can also buy it whole. If going with the latter, start by slicing both ends off the squash. Cut off the section of the squash you’ll be using, and then with a vegetable peeler, remove the skin from the squash. Cut the squash lengthwise, and if necessary, remove the seeds. Then chop into 1” chunks.

    Once the butternut squash is chopped, you’ll throw it into a pot with boiling water and cook for 10-15 minutes. You’ll want the squash to be tender, but not fall apart when you stick a fork through it. Drain the water and set aside. Next, preheat the oven to 400 degrees F. Place a slice of pita bread on a baking sheet, add a layer of tomato sauce, and top with butternut squash chunks. Top with sliced onions, and drizzle with 1 teaspoon of olive oil. Pop the pizza in the oven for 15 minutes, and once it’s ready, dress it up with fresh arugula, feta cheese, balsamic vinegar, and black pepper to taste.

     xo 

    Print
    Butternut Squash Arugula Pita Pizza
    Servings: 1
    Ingredients
    • 1 cup butternut squash, peeled and chopped
    • 1 round pita bread
    • ¼ cup pasta sauce
    • ¼ onion, sliced
    • 1 teaspoon olive oil
    • ½ cup fresh arugula
    • 1 ounce feta cheese
    • 1 tablespoon balsamic vinegar
    • Black pepper to taste
    Instructions
    1. Start by chopping the butternut squash into 1 inch cubes
    2. Pour the 1 cup of squash into a pot of boiling water, and cook for 10-15 minutes or until tender, but still firm
    3. Once done, drain the water and set aside
    4. Preheat the oven to 400F. On a baking sheet, place the pita round and spread the tomato sauce onto the pita.
    5. Spread the butternut squash chunks onto the pita bread evenly, and top with the sliced onions
    6. Drizzle olive oil over the pita, and bake at 400F for 15 minutes.
    7. Remove from the oven and finish off by topping with fresh arugula, feta cheese, balsamic vinegar, and black pepper to taste


    Filed Under: Main Courses

    Collard Chickpea Egg Nest

    May 8, 2016 by Wendy 13 Comments

    In case you’ve missed our other posts about pulses, pulses are a family of legumes that includes lentils, beans, dry peas and chickpeas. They are a rich source of plant-based proteins and amino acids for people around the world, and can be incorporated into meals in so many fun and creative ways.

    Along with protein, pulses are rich in fiber, vitamins and minerals like folate, iron, and potassium. Just one cup of cooked pulses gives you over half of the fiber you need for an entire day! They are rich in soluble and insoluble fiber, both of which offer endless health benefits ranging from weight management to improved digestion.

    Chickpeas are rich in fiber and complex carbohydrates. Chickpeas can be incorporated creatively into so many recipes- just last month, we featured a Chickpea Gazpacho recipe!

    The great thing about pulses is that they are easily accessible to communities in different parts of the world because of their affordability. They are also amazing for our environment- pulses use only a fraction of the water other protein sources use. They enrich our soil, which results in crops with improved nutrient profiles. With all of that being said, let’s get to this recipe! It’s incredibly easy to whip up, and consists of throwing all ingredients into a skillet. Before you know it, you’ll have a satisfying dish that can be enjoyed for breakfast or even dinner.

    Print
    Collards Chickpea Egg Nest
    Servings: 1
    Ingredients
    • 1 tablespoon olive oil
    • 1/4 onion, chopped
    • 2 cloves garlic, minced
    • 1 cup collard greens, thick stems removed, finely sliced
    • 1/2 cup cooked chickpeas
    • 1/2 cup tomato sauce
    • 2 eggs
    • Salt & pepper to taste
    Instructions
    1. On a pan or skillet, heat the olive oil and add the onion and garlic. Sauté for 1 minute over low-medium heat
    2. Then add the collards, and sauté with the onion and garlic. Place the lid on the skillet, and allow to cook for 3 minutes
    3. Remove the lid, add the chickpeas and tomato sauce to the pan, and cook together for another 3 minutes over low-medium heat, with the lid on
    4. Next you'll crack your eggs and allow them to cook without the lid for 6-8 minutes or until the desired doneness is reached
    5. Top with salt and pepper, to taste
    Recipe Notes

    Enjoy with toast!

    Filed Under: Breakfast, Main Courses

    Jalapeño Cornbread

    April 29, 2016 by Wendy 8 Comments

    This light jalapeño cornbread has been a hit in my home this week. My mother was so impressed (not an easy task) and literally called my father that same night going off about how good my cornbread was. I’m not sure what exactly inspired me to make cornbread. I wasn’t raised eating cornbread and don’t typically eat it (ever). Last week I was randomly browsing cornbread recipes and was completely shocked at some of the ingredient measurements going into these recipes. There was no way I was making cornbread with a crap load of buttermilk, sugar, and butter, and so I jumped into experimentation. And that’s how this delight came about.

    I used oat flour instead of regular wheat flour for this one. Oatmeal has more iron, calcium, vitamin A and B6, per serving. 

    Now let’s get to cooking. To make oat flour, you simply need to blend rolled oats until a flour consistency has been reached. Then you’ll combine all your dry ingredients together and mix them well. Next comes the egg beating. You can do this using a whisk or an electric mixer, which is what I used. If you enjoy baking, then definitely invest in this handy kitchen tool. Although whisking is a great arm workout, electric mixers cut down on time and energy spent in the kitchen. Once the eggs are foamy, you’ll drop them into the dry ingredients bowl, add yogurt and minced jalapeño, and mix all your ingredients well.

    You’ll pour the batter into an 8” skillet (what I used) or an 8×8” pan. If you want to garnish the cornbread with jalapeño rounds, like the ones pictured below, simply slice another jalapeño in rounds, remove the seeds, and place them onto the batter. Bake at 400F for 20-25 minutes and this delicious bundle of joy is ready to be enjoyed. You can store your cornbread for up to 1 week in the refrigerator. I like heating mine up when it’s time to eat, and topping with butter.

    Do you make cornbread? Share your favorite tips and tricks with us! Made this recipe? Let us know how it turned out in the comments below!

    Print
    Jalapeño Cornbread
    Servings: 8
    Ingredients
    • 1 cup cornmeal
    • 1 cup oat flour*
    • ¼ cup brown sugar
    • 1 teaspoon baking soda
    • ¾ teaspoon salt
    • 2 eggs
    • 1 cup plain yogurt
    • 1 jalapeno, de-seeded and minced
    Instructions
    1. Preheat the oven to 400F
    2. In a large bowl, combine the cornmeal, oat flour, brown sugar, baking soda, and salt. Mix well and set aside.
    3. In a bowl, beat your eggs with a whisk until they’re foamy. You can also use an electric mixer, and beat for 2-3 minutes on high-speed.
    4. Once that’s done, add your beaten eggs, yogurt, and jalapeno to the bowl with the dry ingredients. Mix all ingredients well with a whisk or an electric mixer.
    5. Pour the batter into an oiled 8x8” pan or an 8” skillet.
    6. If you want to top the corn bread with a jalapeno garnish, simply slice another jalapeno in rounds, remove the seeds, and place on the batter.
    7. Bake at 400F for 20-25 minutes. Enjoy with butter.

    Recipe Notes

    To make the oat flour, simply blend rolled oats until a flour consistency has been reached.

    Filed Under: Appetizers, Salads, Sides

    Rosemary Blackberry Spritzers

    April 28, 2016 by Wendy Leave a Comment

    These rosemary blackberry spritzers will be giving you so much life this spring (and summer!) It’s insanely refreshing, and has a gentle touch of sweetness that helps bring all the flavors together. Although I drink mostly water pretty much all day every day, sometimes I like to switch things up. The level of sweetness in most of these commercial beverages is just too damn much, so when I feel inspired to mix things up, I’ll do these fruit-based concoctions. 

    I love incorporating fresh rosemary into recipes and drinks because it adds such a unique flavor profile. This herb works beautifully with both savory and sweet recipes, which makes it super flexible in the kitchen.

    Blackberries rank high on the nutrition scale. Besides the beautiful colors they contribute to this recipe, blackberries are rich in fiber, vitamin C, and vitamin K. Studies have shown that blackberries are one of the highest ranking antioxidant foods. Blackberries are also rich in anthocyanins, a powerful phytonutrient that has been shown to reduce cancer risk. So basically, you need to get yourself some blackberries stat.

    Let’s go over what you’ll be doing for this recipe. First, you’ll combine the seltzer water, lime juice and maple syrup in a bowl. Stir well and set aside. Next comes the blackberries. Mash up ½ cup of berries in a cup, and then drop that into a large jar. Pour the seltzer water mix into the jar as well, and place the rosemary sprigs into the jar. Pierce a few of the rosemary stems to release the flavors.

    When ready to serve, pour into your glasses, top with blackberries and garnish with rosemary sprigs. Enjoy!

    Print
    Rosemary Blackberry Spritzers
    Servings: 3
    Ingredients
    • 3 cups seltzer water
    • 1 lime
    • 1 tablespoon maple syrup
    • 1 cup blackberries
    • 3 sprigs of fresh rosemary
    Instructions
    1. In a bowl, combine seltzer water, the juice of 1 lime, and maple syrup
    2. Mash ½ cup of blackberries in a cup

    3. Then add the blackberry mash to a large jar, along with the seltzer water mix, and rosemary sprigs. Make sure to bruise some of the rosemary stems to release the flavors.
    4. When ready to serve, pour into glasses and top with the rest of the blackberries. Garnish with rosemary.

    Filed Under: Drinks

    Roasted Vegetable Lasagna

    April 26, 2016 by Wendy 10 Comments

    This roasted vegetable lasagna is incredibly filling, and packed with savory layers that will have your mouth watering for more. This lasagna is definitely a lighter version of the traditional lasagna, but trust that the flavor is not compromised. Although we used Brussels sprouts, mushrooms, tomatoes, and broccoli for the vegetable filling, you can use any vegetable that roasts well (zucchini, eggplant and/or cauliflower are great options!) I do suggest keeping the tomatoes in there though because they add an amazing dose of juiciness to the dish.

    Now let’s get started! You’ll want to pop whatever veggies you’ll be using in the oven with a drizzle of olive oil and balsamic vinegar (brings out flavor and color so beautifully!) You’ll bake the vegetables for 20 minutes, and while that’s underway, you’ll set up your stuffing line. Have your tomato sauce and cheeses measured out in small bowls to make your life easier. Once the vegetables are roasted, set them aside.

    Now we’ll move on to the lasagna noodles. If you’re cooking them, follow the package instructions. Make sure they don’t overcook- the noodles should be pliable but firm. Once those are ready, grab an 8×8” baking dish. Line the dish with a thin layer of tomato sauce, and place 3 cooked noodles on the dish. If the noodles are too long, cut them so they match the dish size. Then go ahead and start layering. First tomato sauce, then ricotta cheese, then roasted vegetables, and finish with shredded mozzarella. Keep in mind you want to distribute the ingredients so there’s enough for 2 filled layers + a small bit of sauce and cheeses left to coat the top of the lasagna. Repeat the layering process once more. Then you’ll top the last layer with the remaining 3 lasagna noodles. Add the remaining tomato sauce and cheeses, and bake at 400F for 25 minutes. All done! 

    This recipe yields 6 servings, which means you’ll have enough leftovers for the week! We hope you give this one a try. Make sure to let us know in the comments below what your favorite variation of lasagna is! Hugs

    Print
    Roasted Vegetable Lasagna
    Servings: 6
    Ingredients
    • 1 ½ cup Brussel sprouts, sliced
    • 3 cups mushrooms, sliced
    • 2 cups grape tomatoes
    • 1 cup broccoli florets
    • 1 tablespoon olive oil
    • 1 tablespoon balsamic vinegar
    • 9 lasagna noodles
    • 1 cup tomato sauce
    • 1 cup ricotta cheese
    • 1 cup shredded mozzarella cheese
    • Salt and pepper to taste
    Instructions
    1. Preheat the oven to 400F. On a baking sheet, place your Brussel sprouts, mushrooms, tomatoes, and broccoli florets. Drizzle olive oil and balsamic vinegar, and roast your vegetables at 400F for 20 minutes
    2. While the vegetables are roasting, cook the lasagna noodles as per package instructions. Make sure the cooked noodles are pliable but still firm. You can also skip this step by using no-cook lasagna noodles
    3. Remove the vegetables from the oven and set aside
    4. Coat an 8x8” baking dish with a thin layer of tomato sauce and top with 3 closely aligned (but not overlapping) lasagna noodles
    5. Spread tomato sauce, ricotta cheese, roasted vegetables, and mozzarella on top of the noodles.
    6. Repeat these layers once more, making sure you evenly distribute the ingredients between both layers + a small bit of sauce and cheeses left to coat the top of the lasagna.
    7. Cover the filling with the last 3 lasagna noodles, and top with the remaining tomato sauce, ricotta, and mozzarella cheese
    8. Bake at 400F for 25 minutes
    9. Add salt and pepper, to taste. Enjoy!

    Filed Under: Main Courses

    • « Go to Previous Page
    • Page 1
    • Interim pages omitted …
    • Page 83
    • Page 84
    • Page 85
    • Page 86
    • Page 87
    • Interim pages omitted …
    • Page 96
    • Go to Next Page »

    Primary Sidebar

    Search

    Let’s Connect

    Meet Wendy & Jess

    Registered Dietitians & BFF's. We're probably busy eating right now.

    Subscribe to our Podcast

    food heaven podcast

    Podcast Hookup Codes

    food heaven podcast hookup codes

    Meet Wendy & Jess

    Registered Dietitians & BFF's. We're probably busy eating right now.

    • Diabetes Digital
    • Our Story
    • Recipes
    • Resources
    • Articles
    • Contact
    • Policies
    © Food Heaven Made Easy
    In order to provide you with the best service, our website uses cookies. By continuing to browse the site you are agreeing to our Privacy Policy I consent
    Privacy Policy

    Privacy Overview

    This website uses cookies to improve your experience while you navigate through the website. Out of these cookies, the cookies that are categorized as necessary are stored on your browser as they are essential for the working of basic functionalities of the website. We also use third-party cookies that help us analyze and understand how you use this website. These cookies will be stored in your browser only with your consent. You also have the option to opt-out of these cookies. But opting out of some of these cookies may have an effect on your browsing experience.
    Necessary
    Always Enabled
    Necessary cookies are absolutely essential for the website to function properly. This category only includes cookies that ensures basic functionalities and security features of the website. These cookies do not store any personal information.
    Non-necessary
    Any cookies that may not be particularly necessary for the website to function and is used specifically to collect user personal data via analytics, ads, other embedded contents are termed as non-necessary cookies. It is mandatory to procure user consent prior to running these cookies on your website.
    SAVE & ACCEPT